
Salesforce lead assignment rules are the feature every revenue team switches on first and inspects last. You build the rule, the owner field starts changing, the setup screen turns green, and everyone moves on. Weeks later a rep opens a territory queue and finds thirty leads sitting in it, each one assigned by the rule exactly as written, and not one of them a lead that rep was supposed to receive.
A rule that runs is not the same as a rule that routes correctly. Both facts can be true at once: the assignment fired, the log says success, and the leads still went to the wrong place. That difference only shows up when you test the rule deliberately, and almost no guide on this topic tells you how.
This page is the setup walkthrough and the testing checklist in one. It covers the order of execution, criteria, queues, the default lead owner, and a repeatable way to prove the rule assigns the leads you think it does before you trust it in production.
Direct answer — what are Salesforce lead assignment rules?
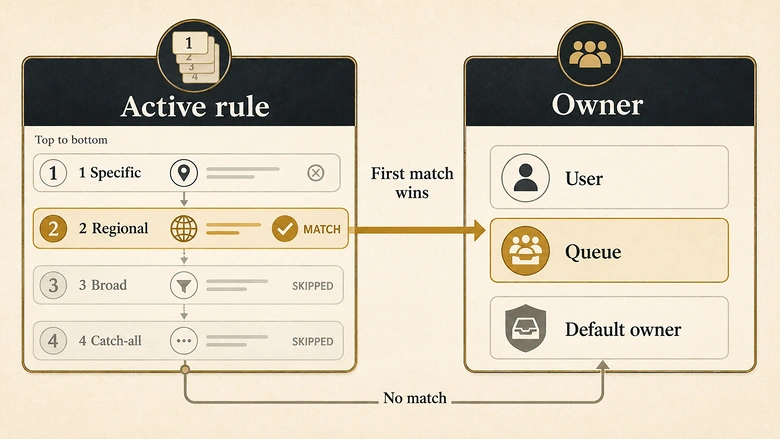
Salesforce lead assignment rules are a single active rule that automatically sets the owner of a new lead based on ordered criteria. Salesforce reads each rule entry from the top, and the first entry whose conditions match assigns the lead to that user or queue. If no entry matches, the lead goes to the Default Lead Owner. The rule runs when a lead is created from most channels, though not always by default: the API is the main exception.
Key Takeaways
- Only one lead assignment rule is active at a time. Every routing scenario you need has to live as an ordered entry inside that one rule, so the order of the entries is the logic.
- Entries are evaluated top to bottom and the first match wins. A lead is never assigned twice, and a broad entry placed too high silently swallows the leads a lower entry was meant to catch.
- No match means the Default Lead Owner, not an error. A lead that looks unassigned has usually fallen through every entry to the fallback owner or queue you set in Lead Settings.
- Assignment rules do not fire on every channel by default. Web-to-Lead and the manual checkbox trigger them; a SOAP API insert does not unless you send the assignment header.
- Testing is the step that separates a rule that runs from a rule that is right. Create one lead per entry, confirm the owner, and confirm the fall-through, before you activate.
How Salesforce lead assignment rules actually work
A Salesforce lead assignment rule is an ordered list of entries, each pairing a set of conditions with an owner, evaluated the moment a lead is created. You can define many rules in Setup, but only one can be active, so in practice “the rule” and “your entire routing logic” are the same object.
Assignment is one stage inside the wider lead routing process, not the whole of it. The rule decides who owns the record; it does not decide whether that owner ever accepts the lead. Keeping those two events separate is what makes the testing section below worth doing.
Entries, sort order, and first-match evaluation
Each entry has a Sort Order number, a set of criteria, and an assignee. Salesforce checks entry 1, then entry 2, and so on, and stops at the first entry whose criteria the lead satisfies. Nothing below that entry is considered.
This is where most misrouting begins. Put a broad entry such as “Country equals United States” above a specific one such as “Country equals United States AND Annual Revenue greater than 100M,” and every enterprise lead matches the broad entry first and never reaches the specific one. Specific and exclusionary entries belong near the top; catch-alls belong near the bottom. Order is only half of it, because a criterion matching the literal string “United States” silently skips every record stored as US or USA, so a country field holding four spellings of one country defeats a perfectly ordered rule just as thoroughly.
The default lead owner is the fallback, not an error state
When a lead matches no entry, Salesforce assigns it to the Default Lead Owner set in Lead Settings, which can be a user or a queue. That is by design. A queue full of “unassigned” leads is almost always a queue of leads that fell through every entry, so the fix is a better catch-all entry, not a bug report.
When the rule fires, by channel
The single most common Salesforce lead assignment question is not how to build a rule but why it did not run. The answer is usually the channel. The active rule fires automatically from some entry points and stays silent on others unless you ask for it.
| Lead creation channel | Rule fires by default? | How to make it fire |
|---|---|---|
| Manual entry (UI) | No | Check “Assign using active assignment rules” on the lead edit page |
| Web-to-Lead | Yes | Automatic; the active rule always runs on submitted leads |
| Import wizard / Data Loader | No | Turn on the assignment-rule option in the import settings |
| REST API | Yes | Sforce-Auto-Assign defaults to TRUE; set it FALSE to suppress |
| SOAP API | No | Send AssignmentRuleHeader with useDefaultRule=true or a specific rule ID |
| Record-triggered Flow | No | Not applied unless you invoke it explicitly through an action or Apex that sets the header |
| Marketing automation (Pardot, Marketo, HubSpot) | Depends | Governed by the connector’s API path and header settings; verify inside the integration |
The REST and SOAP rows are the trap. They are both “the API,” yet they behave in opposite ways when you say nothing: REST applies the active rule by default, while SOAP applies nothing unless the AssignmentRuleHeader is present. An integration that inserts leads through the SOAP API will look completely broken until someone adds one header.
Where assignment sits in the order of execution
Assignment rules run at a fixed point in Salesforce’s save order, and knowing that point explains a whole class of “the field was right but the rule ignored it” problems. According to Salesforce’s documented order of execution, assignment rules fire at step 9: after every before and after trigger has run and the record is saved, and before auto-response rules and workflow rules.
IMPORTANT
A workflow field update runs at step 11, after assignment at step 9. If a workflow changes a field your rule routes on, the rule has already assigned the lead and will not re-evaluate on the new value. Set routing fields before save, in a flow or before-trigger, not in a workflow.
How to set up a lead assignment rule in Salesforce
You create a lead assignment rule in Setup, then add the ordered entries that do the real routing. The rule itself is an empty shell; the entries are the work. Budget most of your time for deciding entry order, not for clicking through the screens.
How to set up a lead assignment rule in Salesforce
Create the active rule, add ordered entries that route leads to users or queues, set a fallback owner, and activate.
Open Lead Assignment Rules
In Setup, type “Assignment Rules” into Quick Find and choose Lead Assignment Rules. This is the single home for lead routing logic in native Salesforce.
Create the rule
Click New, give the rule a clear name such as “Inbound Lead Routing 2026,” and save. Remember that only one rule can be active, so this rule will hold every scenario.
Add the first rule entry
Open the rule and click New in the Rule Entries section. Set Sort Order to 1 for the entry you want evaluated first, usually your most specific or most exclusionary segment.
Define how the entry matches
Choose “criteria are met” for field-operator-value rules, or “formula evaluates to true” for logic that criteria cannot express, such as combining regions with revenue bands. Route only on fields you trust are populated at creation.
Choose the owner
Assign the entry to a specific user or to a queue, and attach an email template if reps should be notified on assignment. Use a queue whenever more than one person shares the segment.
Order the remaining entries
Add each further entry with the Sort Order that reflects evaluation priority. Keep specific entries above broad ones so a catch-all never intercepts a lead a precise entry was built for.
Set the fallback owner, then activate
In Lead Settings, set the Default Lead Owner that catches no-match leads. Return to the rule and mark it Active. Activation makes it the one live rule and deactivates any other.
PRO TIP
Assign overflow and unclaimed segments to a queue, not a person. A queue is a shared inbox any member can pull from, so a lead is never stranded on one rep’s day off. Reserve direct user assignment for named-account owners who are genuinely always accountable.
The quality of a rule is capped by the quality of the fields it reads. If your criteria point at fields that arrive empty or dirty, the rule routes confidently and wrongly. Deciding which leads even deserve routing is a separate discipline worth getting right first, covered in our guide to B2B lead validation criteria.
How to test a lead assignment rule before you trust it
You test a lead assignment rule by creating one deliberate lead for every entry and confirming it lands with the owner that entry names. This is the step the competing guides skip, and it is the only thing that proves the rule does what the setup screen implies. It also protects your speed to lead, because a lead misrouted in silence sits unworked, and unworked minutes are the ones that lose deals.
Run the core test in the UI
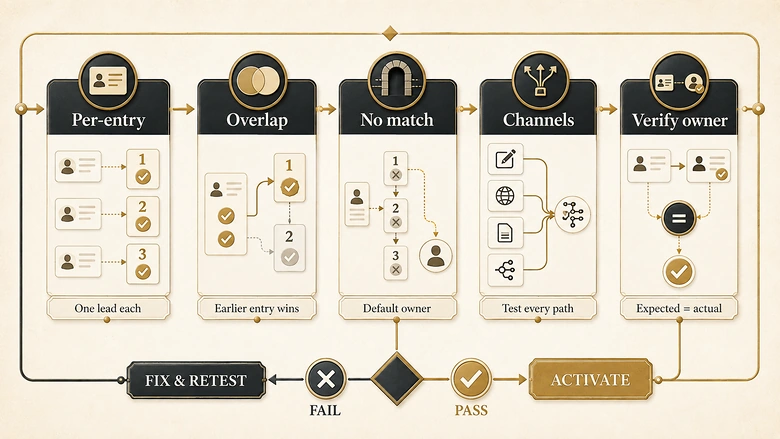
Start where feedback is fastest. Create a lead manually, fill the fields that drive your criteria, and check “Assign using active assignment rules” on the edit page before saving. Then open the lead and read the Owner field. If the box is unchecked, you become the owner and the rule never ran, which is itself the first thing worth confirming.
Work through the entries as a set of cases rather than one happy path:
- One positive lead per entry. Build a lead that should match entry 1, save, verify the owner. Repeat for every entry, so each rule you wrote is proven once.
- One overlap lead. Create a lead that could satisfy two entries and confirm the higher Sort Order wins. This is the test that catches broad-entry-too-high mistakes.
- One no-match lead. Build a lead that satisfies nothing and confirm it lands on the Default Lead Owner. If it lands somewhere else, a catch-all entry is matching more than you think.
Test each channel you actually use
A rule that passes in the UI can still fail from an integration, because firing depends on the channel. Submit a real Web-to-Lead form, run a small Data Loader insert with the assignment option on and then off, and if you insert through the API, test with and without the header. Confirm the owner each way, not just that a record appeared.
FREE CHECKLIST
The Lead Assignment Rule QA & Go-Live Checklist turns this section into a one-page test you can run before every activation, covering per-entry, overlap, no-match, and per-channel cases. Download the one-page PDF checklist and save it with your release evidence.
Testing before go-live is the cheap, preventive version of a lead routing audit. The audit is what you run months later to find the leads a rule quietly misrouted; the checklist above is how you avoid needing one.
Why your Salesforce lead assignment rule is not firing
When an assignment rule appears not to fire, the cause is almost always the channel it was triggered from or an entry above the one you expected to match. The rule engine itself rarely fails; the conditions around it do. This table maps the symptoms teams actually report to the fix.
| Symptom | Likely cause | Fix |
|---|---|---|
| Rule works in the UI but not from an integration | SOAP API insert with no assignment header | Send AssignmentRuleHeader (useDefaultRule=true or a rule ID) on the create call |
| Manually created leads keep the creator as owner | “Assign using active assignment rules” left unchecked | Check the box on the edit page, or drive the record through a channel that auto-assigns |
| Imported leads all ignored the rule | Assignment option off in the import | Enable the assignment-rule setting in Data Loader or the import wizard |
| A specific entry never matches | A broader entry above it matches first | Move the specific entry above the broad one; first match wins |
| A lead looks unassigned or “lost” | It fell through to the Default Lead Owner | Check Lead Settings; that user or queue is where no-match leads land |
| Assignment ignores a field a workflow sets | Workflow field update runs at step 11, after assignment at step 9 | Set the value before save via flow or before-trigger, or route on the original field |
| The wrong logic runs entirely | A different rule is the active one | Confirm the intended rule is marked Active; only one can be |
Limits, and when to outgrow native assignment rules
Salesforce keeps exactly one lead assignment rule active at a time, and that single constraint shapes everything else. Because all of your logic has to fit inside one ordered list, a growing organization’s rule tends to accumulate dozens of overlapping entries until no one can safely predict where a given lead will land.
The native engine also has blind spots by design. It has no built-in round-robin, no awareness of a rep’s current capacity or availability, and no way to reassign a lead that has sat untouched past an SLA. It answers “who should own this,” never “who can act on it right now.”
Choosing user, queue, default, or an app
A short decision framework keeps the rule honest as it grows:
- Assign to a specific user when a segment has one clear, always-accountable owner, such as a named-account executive.
- Assign to a queue when several reps share a pool, or when coverage has to survive any one person’s absence.
- Use the Default Lead Owner as a deliberate, monitored catch-all, never as an accidental dumping ground.
- Reach for a routing app or round-robin logic when you need even distribution, capacity caps, or availability awareness the native rule cannot express.
That last line is the boundary where teams move from native rules to dedicated lead routing software. The trigger is rarely a missing feature in isolation; it is the moment even distribution and rep availability start deciding revenue. Every extra hop between form submit and a human accepting the lead is delay you can measure, and a slow or wrong route turns into lost pipeline rather than a tidy CRM field.
Frequently Asked Questions
Only one lead assignment rule can be active at a time in Salesforce. You can define as many rules as you like, but activating one deactivates the rest, so every routing scenario you need has to live as an ordered entry inside that single active rule. That constraint quietly promotes ordering from housekeeping to design work, because two entries that can both match the same lead make position part of the logic, and the lower entry will never fire again.
It depends on the API. The REST API applies the active rule by default because Sforce-Auto-Assign is TRUE unless you set it FALSE. The SOAP API applies no rule unless you include the AssignmentRuleHeader on the create call, which is a common cause of “broken” integrations.
The lead is assigned to the Default Lead Owner configured in Lead Settings, which can be a user or a queue. This is expected behavior, not an error. Most “unassigned” leads are simply leads that fell through every entry to this fallback owner.
A user assignment gives one named person sole ownership of the lead. A queue assignment places the lead in a shared pool that any queue member can accept and take ownership of. Queues protect coverage when a rep is unavailable; user assignment suits single-owner accounts.
Imports do not apply the active assignment rule unless you enable it. In Data Loader or the import wizard, turn on the assignment-rule option before loading. Without it, imported leads keep the owner set in the file or default to the importing user, and the rule is skipped.