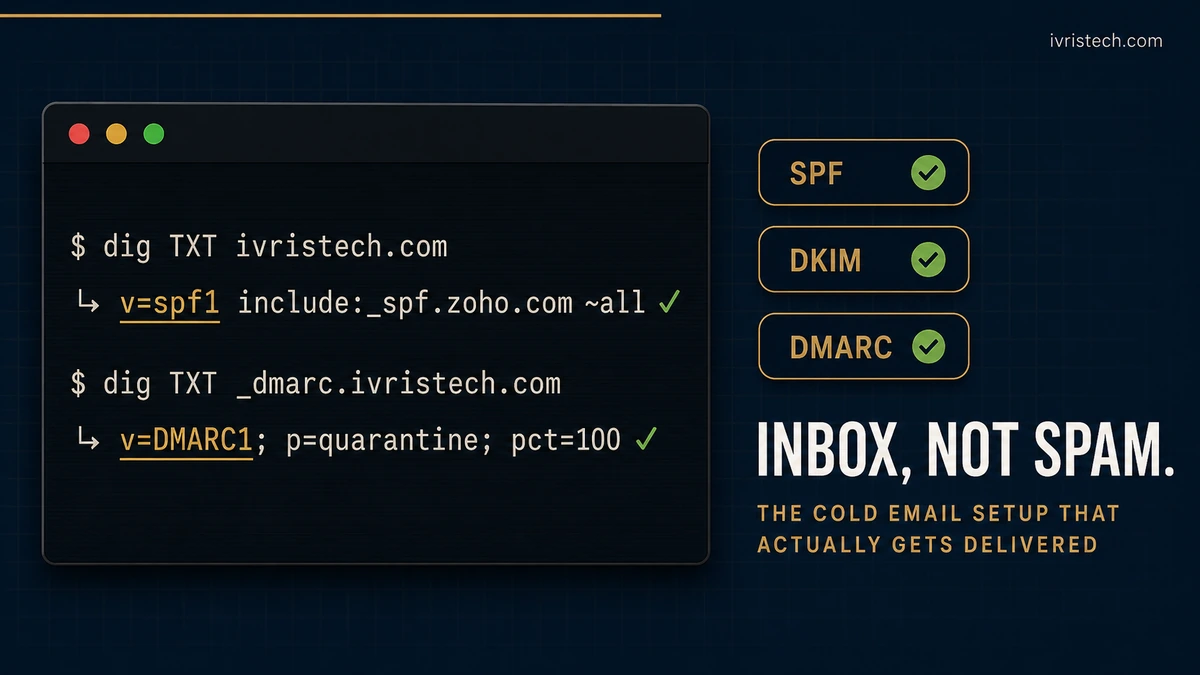
Most cold email setup guides stop at “configure SPF, DKIM, and DMARC, then warm up your domain.” That’s where the work begins, not where it ends. The reason 60%+ of cold email lands in spam isn’t that the records aren’t present. It’s that nobody verified them.
This piece walks through cold email setup as an end-to-end verification checklist. Every stage has a pass criterion you can run yourself with two terminal commands: dig and nslookup. No vendor dashboards. No ESP control-panel screenshots. Just the actual output that Gmail, Outlook, and Yahoo read when they decide whether your email belongs in the inbox or the spam folder.
If you can’t run dig +short TXT _dmarc.yourdomain.com and read what comes back, your setup is fragile. That’s the standard this guide holds to. Configuration takes two to three hours. Verification takes a few minutes per gate. The warmup window adds two to four weeks of patience. Skip any of those phases and your reply rates collapse the moment volume scales.
Key Takeaways
- Cold email setup is seven verification gates, not four: dedicated sending domain, SPF, DKIM, DMARC, MX records, warmup window, deliverability test. Each gate has a single pass criterion you can verify with a terminal command.
- Run
dig +short TXT yourdomain.com,dig +short TXT [selector]._domainkey.yourdomain.com, anddig +short TXT _dmarc.yourdomain.comafter every DNS change. ESP control panels often show a green “configured” status that doesn’t match what public DNS returns. - Per RFC 7208, SPF allows a maximum of 10 DNS lookups per evaluation. Stacked ESP setups (Workspace + Mailgun + transactional + tracker) routinely exceed this and return
permerrorsilently. - Google’s bulk-sender spam-rate target is 0.10% per its February 2024 sender guidelines. At 0.30%, throttling begins. Google Postmaster Tools and Microsoft SNDS show this in real time. Both are free, and most cold senders never register.
- Warmup is 14-30 days minimum. Cutting it short is the single most common failure mode for senders who watch reply rates collapse in week 5-6 once Gmail and Outlook re-categorize the domain as untrusted.
Why Cold Email Setup Usually Fails: The Verification Gap
Most setup failures aren’t configuration failures. They’re verification failures. A team configures SPF, DKIM, and DMARC in their ESP’s control panel. The panel shows green checkmarks. The team moves on. Six weeks later, reply rates have collapsed, and nobody can explain why.
The gap is that ESP control panels report what the panel thinks happened, not what propagated to public DNS. Misconfigured include: directives in SPF, DKIM keys that didn’t propagate because the parent zone’s TTL hadn’t expired, DMARC records pointing to a reporting address with a typo. These are silent failures. The panel reports success. The records are broken.
Verification with terminal commands closes the gap. Whatever public DNS returns when Google or Microsoft queries your records is what those providers see. If dig shows it, the inbox provider sees it. If dig doesn’t, the panel lied — even if your warmup tool reports 100% inbox placement to its own dashboard. Cold email is the demand side of the outbound stack, and every reply is a self-qualified prospect raising their hand before retargeting picks them up. That demand only converts if the email lands in front of the prospect. Verification is what determines that.
The 7-Stage Cold Email Setup Checklist
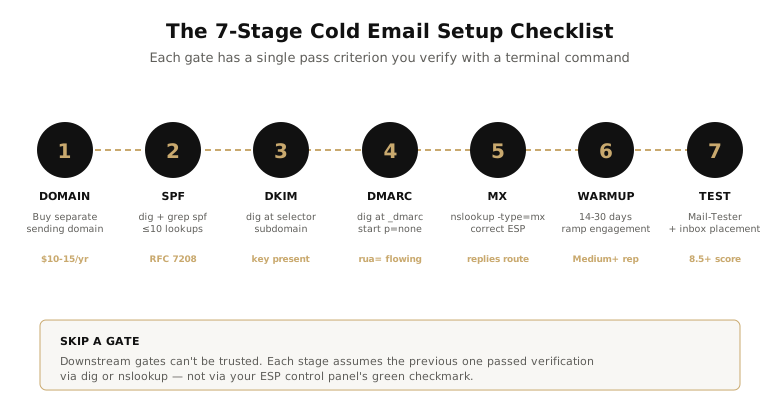
Cold email setup is seven sequential verification gates. Each gate has a single pass criterion. Skip a gate and the downstream gates can’t be trusted, because each stage assumes the previous one passed. The seven gates verify what ESP panels can’t: public DNS state, sender reputation at the receiving providers, and inbox-provider trust earned during warmup.
- Buy a separate sending domain. Cost: $10-15/year.
- Configure SPF and verify with
dig. Pass: record returns, nopermerror, ≤10 DNS lookups per RFC 7208. - Configure DKIM and verify with
dig. Pass: public key present at selector subdomain. - Configure DMARC and verify with
dig. Pass: record returns starting atp=none, aggregate reports flowing to therua=address. - Sanity-check MX records with
nslookup. Pass: records point to the ESP you actually configured. - Run the domain warmup window. Duration: 14-30 days. Pass: Google Postmaster Tools shows Domain Reputation at Medium or High.
- Run an end-to-end deliverability test. Pass: Mail-Tester score 8.5+, primary-inbox placement above 80%.
Workflow · 3 hr active config (+ 14-30 day warmup window)
How to set up cold email: 7-stage verification checklist
Sequential setup with a verifiable pass criterion at each stage. Run every stage’s verification command before moving to the next.
Buy a separate sending domain
Register a lookalike of your primary domain at Cloudflare Registrar or Porkbun for $10-15 per year. Use this domain exclusively for cold outreach. Never send cold from the transactional domain that carries your invoices and recovery emails.
Configure SPF and verify with dig
Add the TXT record your ESP specifies. Run
dig +short TXT yourdomain.com | grep spf. Verify the record returns and contains the correctinclude:directive. Confirm total DNS lookups stay at or under 10 per RFC 7208.Configure DKIM and verify with dig
Generate the DKIM key in your ESP and publish the TXT record at the selector subdomain. Run
dig +short TXT [selector]._domainkey.yourdomain.com. Confirm the public key string returns intact.Configure DMARC and verify with dig
Publish the DMARC record at
_dmarc.yourdomain.comwith policyp=noneand arua=mailto:address for aggregate reports. Verify withdig +short TXT _dmarc.yourdomain.com. Watch aggregate reports for 4-6 weeks before escalating policy.Sanity-check MX records with nslookup
Run
nslookup -type=mx yourdomain.com. Confirm the returned MX records point to the ESP you intend to use. Stale MX records from a previous provider silently route bounces and replies away from you.Run the domain warmup window
Send 20-30 emails per day in week 1, ramping to 50/day by day 7, 100/day by day 14, 200/day by day 21. Register the domain in Google Postmaster Tools and Microsoft SNDS on day 1 so reputation data accumulates from the start. Pass: Domain Reputation at Medium or High before sending production volume.
Run an end-to-end deliverability test
Send a test email to the unique address Mail-Tester or GlockApps assigns. Target a score of 8.5+ before sending live. Cross-verify with an inbox placement test against fresh Gmail, Outlook, and Yahoo seed accounts. Triage failures against the Common Failures section before launching the first real campaign.
Stage 1: Buy a Separate Sending Domain
A dedicated sending domain is a lookalike of your primary domain that exists exclusively for outbound email. The standard patterns: company.com becomes companygroup.com, joincompany.com, or hireatcompany.com. The cost is $10-15 per year at Cloudflare Registrar or Porkbun.
The reason for separation is reputation insurance. A deliverability incident on the dedicated domain only hurts the dedicated domain. The transactional domain that carries your invoices, recovery letters, and customer notifications stays clean. The cost of skipping this step is that one bad cold campaign can silently route every invoice you send for the next six months into spam folders across your customer base. That same clean primary domain is where the marketing email that stays on your primary domain lives, the opt-in newsletters and nurture sends, so protecting it is as much about your marketing program as your invoices.
IMPORTANT
Never reuse a domain you’ve previously used for transactional email. Even if you reset DNS, the historical reputation Google and Microsoft store on the domain persists for months. Buy fresh.
Beyond the registrar, the only Stage 1 verification is that the WHOIS record propagates and the domain resolves. Run dig +short A yourdomain.com after pointing nameservers. If anything returns, you have a live domain to build the next stages on. Whether you’re sending through Instantly, Lemlist, or Smartlead, the tool you send through inherits this trust. None of them can compensate for a domain Google has flagged for low reputation. Pick the tool after the domain is live, not before.
If you’re evaluating cold email vendors who promise to handle setup for you, ask for proof of the deliverability work that agencies often quietly skip. Postmaster Tools dashboard exports and DMARC aggregate reports from the last 30 days are the only honest evidence a vendor can show. Anything less and you’re paying for a black box. That evidence matters most when you outsource the whole motion, since a managed outbound agency that brings its own sending infrastructure should never be sending your cold volume from your primary domain in the first place.
Stage 2: Configure SPF and Verify with dig
SPF (Sender Policy Framework, defined in RFC 7208) is the DNS record that tells receiving mail servers which IP addresses are authorized to send email from your domain. It lives at the root of your domain as a TXT record.
The record format your ESP gives you looks roughly like:
v=spf1 include:_spf.google.com include:sendgrid.net ~all
Publish that TXT record at the root. Wait for TTL to expire (5-15 minutes for most providers). Then verify:
dig +short TXT yourdomain.com | grep spf
The output should be the string you published, quoted. If nothing returns, the record didn’t propagate or your DNS provider rejected the syntax. If multiple SPF records return, you have a serious problem. RFC 7208 allows exactly one SPF record per domain; multiple records cause a permerror and most receivers will fail-soft on all of them.
PRO TIP
SPF allows a maximum of 10 DNS lookups per evaluation. Each include: mechanism counts as one lookup, and the included domain may chain to more. If you stack Google Workspace + a separate ESP + a transactional service + a CRM tracker, you’ll cross 10 fast. MxToolbox’s SPF Record Lookup counts your total lookups in real time.
The Common Failures section below covers the most frequent SPF mistakes (too many lookups, missing include: directive, wrong ~all versus -all policy choice). For now: if the record returns and contains the expected include: directives, the gate passes.
Stage 3: Configure DKIM and Verify with dig
DKIM (DomainKeys Identified Mail) adds a cryptographic signature to every outgoing email. The receiver fetches your public key from DNS, decodes the signature, and confirms the message wasn’t modified in transit. DKIM is the strongest signal you can send that the email genuinely originated from your domain.
Generate the DKIM key in your ESP’s deliverability settings. You’ll get two values: a selector name (something like s1, google, k1, or mta1) and a long public key string starting with v=DKIM1;. Publish the public key as a TXT record at the selector subdomain.
So if your selector is s1 and your domain is yourdomain.com, the record lives at s1._domainkey.yourdomain.com.
Verify:
dig +short TXT s1._domainkey.yourdomain.com
The output should be the public key, quoted and possibly broken into multiple strings concatenated. If dig returns nothing, the key didn’t propagate (wait another 15 minutes) or you published it at the wrong selector subdomain. The most common Stage 3 mistake is publishing the key at _domainkey.yourdomain.com instead of [selector]._domainkey.yourdomain.com.
Stage 4: Configure DMARC and Verify with dig
DMARC (Domain-based Message Authentication, Reporting, and Conformance) is the policy layer that sits on top of SPF and DKIM. It tells receiving mail servers what to do when a message fails authentication, and it gives you aggregate reports on which senders are passing or failing checks on your behalf.
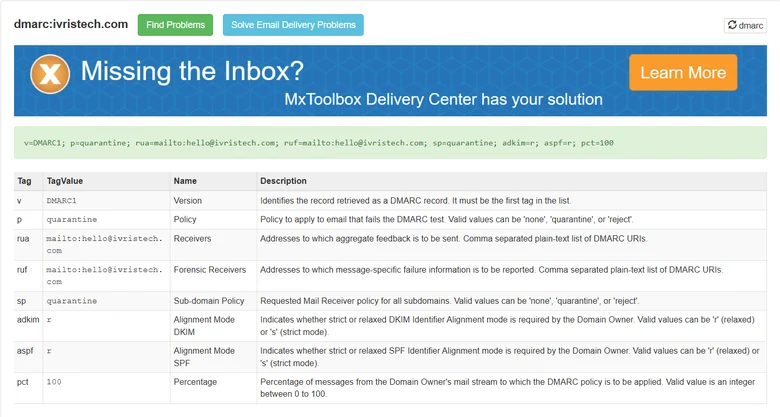
The DMARC record lives at _dmarc.yourdomain.com and looks like:
v=DMARC1; p=none; rua=mailto:dmarc-reports@yourdomain.com; pct=100; aspf=r; adkim=r
Verify with:
dig +short TXT _dmarc.yourdomain.com
Pass criterion: the record returns, starts with v=DMARC1, has a valid p= policy, and has a rua= aggregate-reporting address that actually exists. If rua= points to an inbox no one monitors, you’re flying blind. Set up a dedicated mailbox or use a DMARC parser like Postmark’s free DMARC Digests or dmarcian’s free tier.
DMARC Policy Progression: p=none → p=quarantine → p=reject
The DMARC policy field has three values. Each one tells receivers to take a more aggressive action on messages that fail SPF and DKIM. Most senders publish p=reject on day one because a tutorial told them to. That breaks legitimate email and nobody finds out until customers stop replying. The right approach is a measured five-step escalation:
- Start at
p=none. Receivers don’t act on failures, but they do send you aggregate reports. Your traffic flows normally while you learn who’s authenticating on your behalf and who isn’t. - Watch aggregate reports for 4-6 weeks. Confirm that 95%+ of legitimate traffic passes both SPF and DKIM alignment. Identify any third-party senders (your CRM, your transactional service, your booking tool) that need to be added to SPF or have DKIM signing enabled.
- Escalate to
p=quarantine. Failing messages now route to spam instead of the primary inbox. Watch Postmaster Tools for any drop in legitimate domain reputation. - Verify legitimate traffic survives quarantine. Internal email, partner email, automated notifications: confirm each one still lands. If reputation drops, roll back to
p=noneand find the gap. - Escalate to
p=reject. Failing messages now bounce. This is the final state. You’re protected against spoofing of your domain, and your authenticated mail enjoys the strongest deliverability signal available.
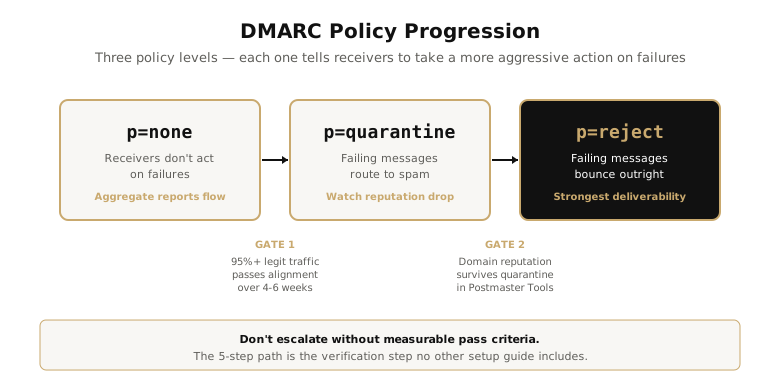
Each step has a measurable pass criterion. Don’t escalate without it. The five-step path takes 2-3 months of patience and is the verification step no other setup guide includes. If you would rather watch enforcement progress on a dashboard than track it by hand, the SaaS platforms that automate the DNS verification this guide does by hand monitor exactly this escalation for you.
Stage 5: Sanity-Check MX Records with nslookup
MX (Mail Exchanger) records tell other mail servers where to deliver email to your domain. Even for an outbound-only cold email domain, MX matters because bounces, replies, and out-of-office messages route through your MX. Misconfigured MX means you never see the reply that would have closed the deal. That domain is outbound-only on purpose, and the reasoning behind keeping cold outreach on a dedicated domain rather than your primary is what stops one misfired campaign from taking your real mailflow down with it.
Verify:
nslookup -type=mx yourdomain.com
The output lists each MX record with a priority number and a server hostname. Confirm the hostnames point to the ESP you’re using. For Google Workspace, you’ll see aspmx.l.google.com, alt1.aspmx.l.google.com, and so on. For Microsoft 365, yourdomain-com.mail.protection.outlook.com. If you see hostnames from a provider you no longer use, your replies are routing to a defunct inbox. Update MX records and watch Stage 7’s inbox-placement test improve immediately.
Stage 6: Run the Domain Warmup Window
A new sending domain has no reputation history. Gmail, Outlook, and Yahoo treat new domains with suspicion by default. Warmup is the process of building reputation gradually by sending a small volume of high-engagement email until providers learn your domain is legitimate. That warmup engine usually lives inside the sending platform itself, so the cold email software that runs on top of this setup determines how fast the reputation actually builds and how well it holds once you scale.
The warmup volume schedule that consistently survives the major inbox providers’ rate-shaping:
- Days 1-3: 20-30 emails per day, sent to engaged contacts who will open and reply.
- Days 4-7: Ramp to 50 emails per day.
- Days 8-14: Ramp to 100 emails per day.
- Days 15-21: Ramp to 200 emails per day.
- Day 22+: Match your target sending volume, but no more than 2× the previous week’s peak.
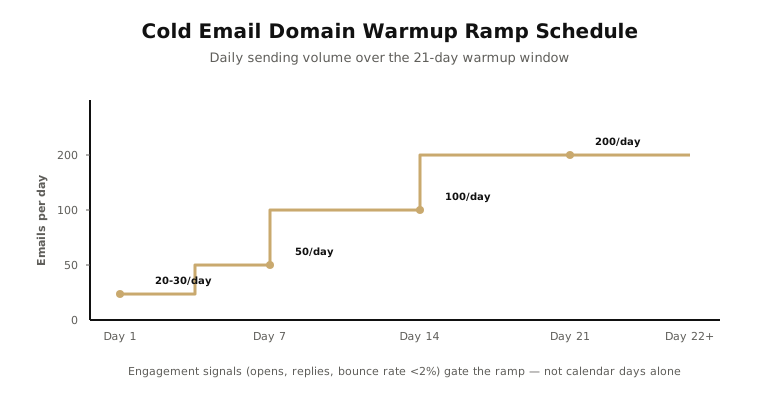
Postmark’s research on domain warmup recommends 3-6 weeks for managed warmup to reach dependable full-volume deliverability, with engagement signals (open rates above 20%, bounce rates under 2%) used as the gate for ramping volume rather than calendar time alone. The Postmark warmup guide goes into the engagement-weighted ramp logic in detail. Warmup follows the same discipline of slow, signal-respecting outreach that works for cold outreach in any channel. Ramp the volume the recipient’s inbox provider expects, not the volume your campaign target demands.
Most cold email tools (Instantly, Smartlead, Lemwarm, Mailwarm) automate warmup by sending and replying to fake-but-coordinated email between participating accounts. This is better than nothing, but the engagement signals are synthetic. Real warmup mixes automated tool traffic with manually-sent emails to real contacts who actually reply.
Stage 7: Run an End-to-End Deliverability Test
Before launching the first real campaign, send a test email through your actual sending stack to a deliverability-test address. Mail-Tester is the standard free option: it grades your email on a 10-point scale based on authentication, content, formatting, blacklist presence, and DNS configuration. Passing that test only clears the infrastructure; the follow-up cadence and stop rules that run after the test passes decide whether the live campaign earns replies without turning healthy delivery into recipient complaints.
Pass criterion: score 8.5 or higher. Below 8.5 and something’s broken. The Mail-Tester report tells you exactly what.
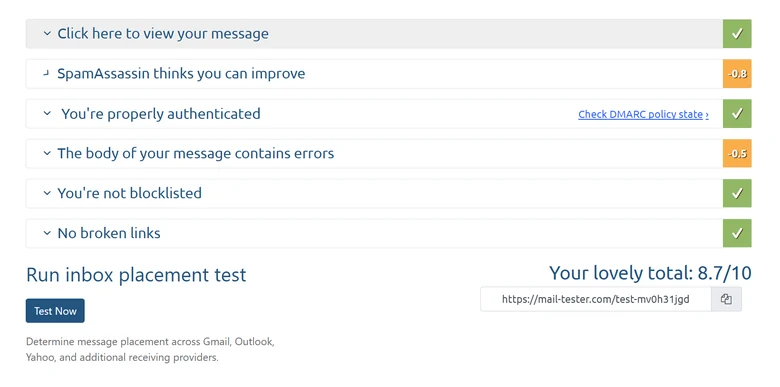
Mail-Tester catches authentication issues but doesn’t show inbox placement. For that, run a separate test with a service like GlockApps, MailReach Inbox Tester, or a manual seed-list test: send the same email to fresh accounts at Gmail, Outlook, Yahoo, and AOL, then check which folder each one lands in. Primary inbox above 80% is the threshold for a healthy production sender.
How to Read Your dig Output Line-by-Line
The output of dig +short TXT _dmarc.yourdomain.com looks compact and unhelpful at first. Once you can parse it, you can debug almost any DNS-level deliverability issue in under a minute. Here’s a real example output and what every segment means.
For SPF, a typical dig +short TXT yourdomain.com | grep spf returns:
"v=spf1 include:_spf.google.com include:mail.zendesk.com ~all"
The v=spf1 declares the record version. Always 1; SPF has never had a v2. The include: mechanisms each delegate authorization to another domain’s SPF record (Google’s, Zendesk’s). Each one counts as a DNS lookup. The trailing ~all is the policy: soft-fail on unauthorized senders. -all would be hard-fail (more aggressive, more likely to break legitimate senders during the early warmup window).
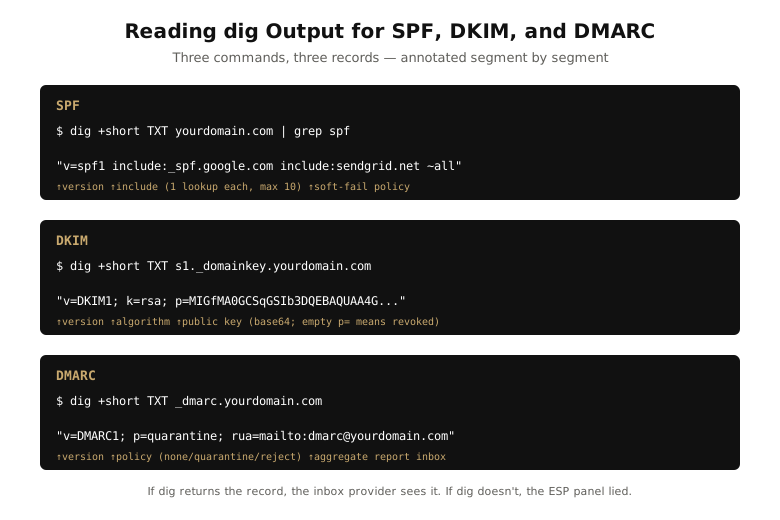
For DKIM, dig +short TXT s1._domainkey.yourdomain.com returns:
"v=DKIM1; k=rsa; p=MIGfMA0GCSqGSIb3DQEBAQUAA4G..."
The v=DKIM1 is the version. k=rsa is the key algorithm. p= is the public key, base64-encoded. If p= is empty or missing, the key has been revoked or never published correctly.
For DMARC, dig +short TXT _dmarc.yourdomain.com returns:
"v=DMARC1; p=quarantine; rua=mailto:dmarc@yourdomain.com; pct=100; aspf=r; adkim=r"
The p= is the policy (none, quarantine, or reject). The rua= is the aggregate-report address. The pct=100 applies the policy to 100% of failing messages (you can ramp this from 25% during quarantine escalation). The aspf=r and adkim=r are the alignment modes: r for relaxed, s for strict. Relaxed allows subdomain alignment; strict requires exact-match.
Common Cold Email Setup Failures (and How to Fix Them)
These six failures account for roughly 80% of all cold email deliverability problems we see flagged in deliverability audits. Each has a diagnostic command and a fix. Each diagnostic surfaces the broken record in under a minute and each fix takes 5-15 minutes. Run them in the order below to avoid cascade re-breakage.
1. SPF exceeds 10 DNS lookups (permerror). Diagnostic: paste your SPF record into MxToolbox’s SPF lookup tool and read the lookup count. Fix: consolidate ESP include: directives, drop unused services, or use an SPF flattening service that resolves all include: mechanisms into a single static record.
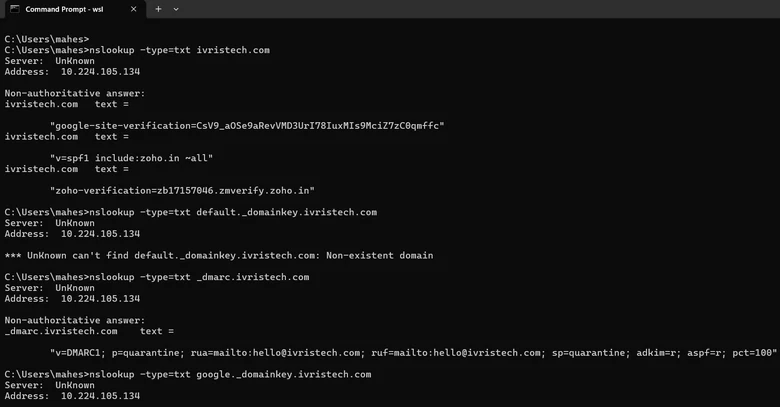
2. DKIM published at the wrong selector subdomain. Diagnostic: dig +short TXT [selector]._domainkey.yourdomain.com returns nothing, but dig +short TXT _domainkey.yourdomain.com returns the key. Fix: re-publish the TXT record at the correct selector subdomain. Some DNS providers strip the selector when you paste in a “TXT record” without specifying the subdomain prefix.
3. DMARC p=reject from day one. Diagnostic: aggregate reports show high failure rates on legitimate senders (your CRM, your booking tool, your invoicing platform). Fix: roll back to p=none, watch reports for 4-6 weeks, identify and fix the failing senders, then escalate progressively.
4. Sub-domain DMARC alignment broken. Diagnostic: aggregate reports show failures on email sent from mail.yourdomain.com when DMARC is published at the root with aspf=s (strict alignment). Fix: switch to aspf=r (relaxed) or publish a separate DMARC record at the subdomain.
5. Sending volume jumped too fast post-warmup. Diagnostic: Postmaster Tools shows Domain Reputation dropping from Medium/High to Low within a week of scaling. Fix: cut volume back to 50% of the previous week’s average and ramp more gradually. Domain reputation recovers in 2-3 weeks if engagement signals stay healthy.
6. MX records still pointing to a previous provider. Diagnostic: nslookup -type=mx yourdomain.com returns hostnames that don’t match your current ESP. Fix: update MX records in your DNS provider, wait for TTL to expire (often 1-24 hours), re-test. Stale MX records silently route replies and bounces away from you.
When to Escalate to Google Postmaster Tools and Microsoft SNDS
Google Postmaster Tools and Microsoft SNDS are the two free dashboards that show you what those providers think of your sending domain. Both are free. Most cold senders never register either one, which means most cold senders are flying blind.
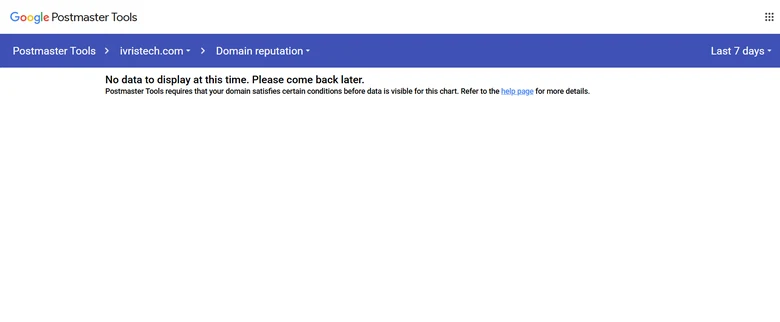
Google Postmaster Tools shows Domain Reputation (High / Medium / Low / Bad), IP Reputation, Authentication results, Encryption rates, Spam Rate, and Delivery Errors. Register on day 1 of warmup. Verify domain ownership via TXT record. Reputation data starts accumulating within 24-48 hours. According to Google’s email sender guidelines, bulk senders must keep Spam Rate below 0.30% (warning threshold) and ideally under 0.10% (target threshold).
Microsoft SNDS (Smart Network Data Services) gives the same signal for Outlook, Hotmail, and Live.com inboxes. SNDS is IP-based rather than domain-based, so it’s most useful when you’re sending from a static IP (dedicated ESP plans, self-hosted mail server). Filter Result categories: Green (Good), Yellow (Warning), Red (Blocked). Yellow means something’s degrading. Red means delivery to Outlook addresses has stopped.

Escalation rule of thumb: if Postmaster Tools shows Spam Rate above 0.10% for three consecutive days, pause new campaigns, audit list quality, and check that warmup-tool engagement is real (not synthetic). If SNDS turns Yellow, stop sending to Outlook addresses until the filter result returns to Green.
What Comes After Setup
Setup is one-time work. The recurring leverage points after setup are list quality, subject lines, copy, and reply handling. Once the seven gates pass, you stop iterating on infrastructure and start iterating on the message. Deliverability is one-time verification you re-run quarterly; message work is the recurring craft that compounds reply rates over months. Pick your baseline carefully before you measure that compounding, because the published reply-rate benchmarks disagree by a factor of nineteen and most of them do not state what their percentage is a percentage of. One decision sits above all four of them, because how many touches exist and how far apart they sit is settled before a single line of that copy gets written.
Once the DNS chain validates and your warmup window closes clean, the next leverage is the subject line — the subject line is where deliverability buys you a click or wastes one. A perfectly-configured sender stack with a bad subject line still gets 1.5% open rates. A correctly-tuned subject line on top of verified DNS gets 35-50%.
Re-verify the entire 7-stage checklist every quarter. DNS records drift. ESP changes ripple through SPF. New transactional services creep in and break alignment. Quarterly verification keeps the stack honest.
Is cold email legal? B2B email rules by region (2026)
Cold B2B email is broadly permitted in the US, conditional in the UK and Australia, and consent-first (and riskier) in Canada and much of the EU. The rules below govern marketing email to business contacts. Confirm the current statute for the market you send into before you press send. Clearing that statute is only half of it, because the lawful basis for holding the data is a separate question from permission to send, and a list you may legally email can still be one you had no grounds to build.
| Region | Consent model | Core rules for B2B email | Penalty exposure |
|---|---|---|---|
| United States (CAN-SPAM) | Opt-out | No prior consent needed. Accurate sender and subject lines, a valid physical postal address, a clear opt-out honored within 10 business days, and the message identified as an ad. | Up to $53,088 per email (2025 FTC adjustment) |
| Canada (CASL) | Opt-in (express or limited implied) | Among the strictest, and it applies to B2B. Needs consent (express, or implied via an existing business relationship for 2 years or an inquiry for 6 months), full sender identification, and a working unsubscribe honored within 10 days. | Up to CAD $10M per violation (business) |
| United Kingdom (PECR + UK GDPR) | Soft opt-in for corporate subscribers | Email to corporate subscribers (Ltd/LLP) is allowed without prior consent under PECR, provided you identify the sender, offer an opt-out, and have a UK GDPR lawful basis for any named individual. Sole traders and partnerships need consent. | PECR up to £500,000 (UK GDPR up to £17.5M / 4% for personal-data misuse) |
| European Union (GDPR + ePrivacy) | Generally opt-in | Consent is the default; any legitimate-interest latitude for B2B is member-state dependent (Germany is notably strict). Identify the sender, provide an opt-out, and document your lawful basis. | Up to €20M or 4% of global turnover |
| Australia (Spam Act 2003) | Consent (express or inferred) | Inferred consent is allowed where a work address is conspicuously published and relevant to the role (no corporate-versus-personal distinction, unlike the UK). Identify the sender and include a functional unsubscribe. | Civil penalties up to about AUD $2.22M per day |
Bottom line: build your list and sending posture around the strictest market you actually email into. This is a summary for marketers, not legal advice, so verify the current statute before a campaign. Last reviewed: June 2026.
Frequently Asked Questions
The rules differ by country. The US (CAN-SPAM) is opt-out, so B2B cold email is broadly allowed. The UK permits B2B email to corporate subscribers under PECR, and Australia allows it with express or inferred consent, but Canada’s CASL and much of the EU require opt-in consent first. The same campaign can be compliant in one market and a violation in another, so check the by-region table above before sending across borders.
The 30/30/60 rule is a warmup heuristic: send 30 emails per day for the first 3 days, ramp to 60 per day by week 2, and stay at 60 until the domain reputation stabilizes in Postmaster Tools. It’s a starting framework, not a rule. The actual safe ramp depends on your warmup tool’s engagement signals and your inbox provider’s rate-shaping response.
Yes, with conditions. The CAN-SPAM Act allows commercial cold email if the sender uses an accurate “From” address, a non-deceptive subject line, identifies the message as a commercial communication, includes a physical postal address, and honors opt-out requests within 10 business days. Recipients in the EU, UK, and Canada are covered by GDPR, PECR, or CASL respectively, which have stricter consent requirements.
2-3 hours of active configuration plus a 14-30 day warmup window. Configuration is the fast part: registering the domain, publishing DNS records, registering Postmaster Tools and SNDS. Warmup is the patience tax. Cutting warmup short is the single most common failure mode for senders who watch reply rates collapse in week 5-6 once Gmail and Outlook re-categorize the domain as untrusted.
Run three dig commands. SPF: dig +short TXT yourdomain.com | grep spf. DKIM: dig +short TXT [selector]._domainkey.yourdomain.com. DMARC: dig +short TXT _dmarc.yourdomain.com. Then cross-check with Google Postmaster Tools (shows authentication failures over time for Gmail) and Microsoft SNDS (same signal for Outlook and Hotmail inboxes). If dig shows it, providers see it. If not, the ESP control panel lied.
Yes. Cold email sends from a separate $10-15/year domain (e.g., get-yourbrand.com if your primary is yourbrand.com) so when Gmail or Outlook spam-filter the campaign, your primary’s transactional mail, sales replies, and billing notices stay clean. Give the parking domain its own SPF, DKIM, DMARC, and a redirect to the primary.
Three configurations carry 80% of the outcome: SPF + DKIM + DMARC verified via dig (not trusted from the ESP panel), a separate sending domain, and a 14-30 day warmup. Most setup failures are verification failures, not configuration failures. The remaining 20% (list hygiene, subject lines, reply signals) compounds only if the 80% is verified.